In an effort to create a common dialog between coaches, athletes and officials, we are recommending the following safety zones for each event venue.
It is our belief that using and honoring these safety zones, and teaching them to our athletes, will lead to safer venues and reduce the chance for injury to athletes, officials and spectators.
For each of the throwing events, we have established recommended safety zones. Each throwing area has 4 zones: green, yellow, light red and red. We look at these as safest (![]() ), cautionary (
), cautionary (![]() ), potential danger (
), potential danger (![]() ) and danger (
) and danger (![]() ).
).
The size of the safety zone will vary, depending on the terrain of your particular throwing venue, the proximity of other events or features, and other game‐day factors such as wind.
Remember that these zones are recommendations only, and that anytime an implement is being throw, rule #1 should always be followed ‐ never turn your back to the circle or runway!
These safety zone maps can be downloaded and printed to distribute to athletes and visiting coaches by visiting the NTCA Safety site (http://www.mach2k.net/NTCA/safety/index.html).
A good habit to get into would be to post the map (in color) near each throwing area so that anyone can visually see where the potential danger areas are.
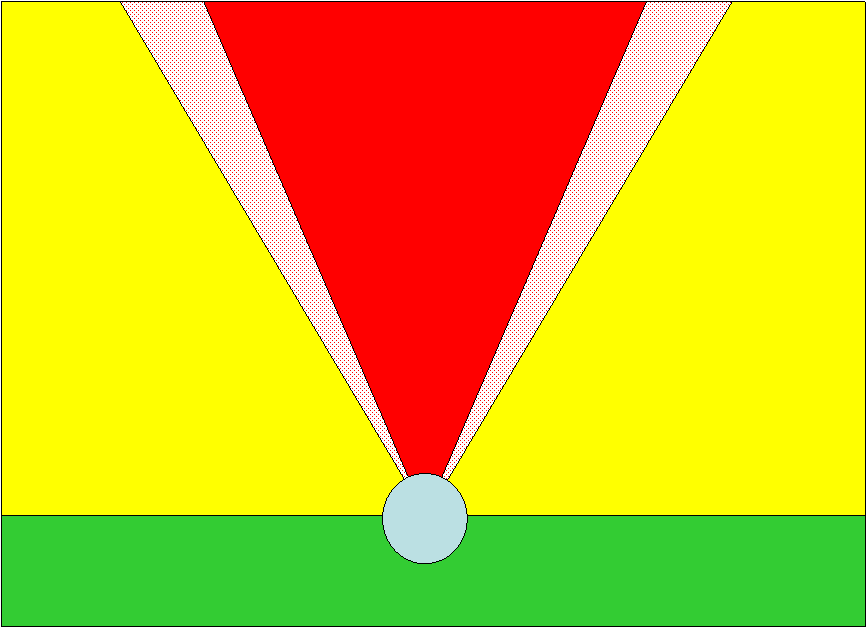
![]() Green (safest)
Green (safest)
The green area is from the circle bisector (where it delineates the front and back half) toward the rear of the circle. The potential for being struck with the implement in this area is minimal, and is most often off‐limits to all but competitors and officials.
![]() Yellow (cautionary)
Yellow (cautionary)
The yellow area begins from the circle bisector toward the front of the sector, including the area outside the sector, extending out in the direction of the landing area on both sides of the sector. There is the chance that a competitor, official or spectator could be struck while in this area. The risk increases nearer to the sector lines, and eventually moves into the potential danger (light red) area. In the cautionary area, care should be taken to ensure that stray throws, especially those from rotational throwers, do not take anyone unawares.
![]() Light red (potential danger)
Light red (potential danger)
The light red zone begins at the toe board, and increases in width as it extends into the landing area. As the sector widens, the width of the light red zone widens as well. As you near the sector line, the potential for someone to be hit increases dramatically in this zone. Caution should be exercised in this zone, and only officials should be in this zone at any time. Do not allow athletes to come into the light red zone at any time to retrieve implements. Either have an official or adult worker return the implements to a designated location, or develop and use some type of implement return device.
Note that the NCAA mandates a 55o safety zone for all throwing events from the 34.92o sector.
![]() Red (danger)
Red (danger)
This is the area inside the sector. We usually assume that the throw will land inside the sector, as the majority of throws do. This creates the greatest hazard area ‐ not just from flying implements, but also from those that are rolling along the ground or that may bounce or ricochet after hitting a divot in the landing area. Meet management should take care to push in divots in the landing area as best as possible, and fill in those that cannot be pushed in, especially if the landing area is grass covered.
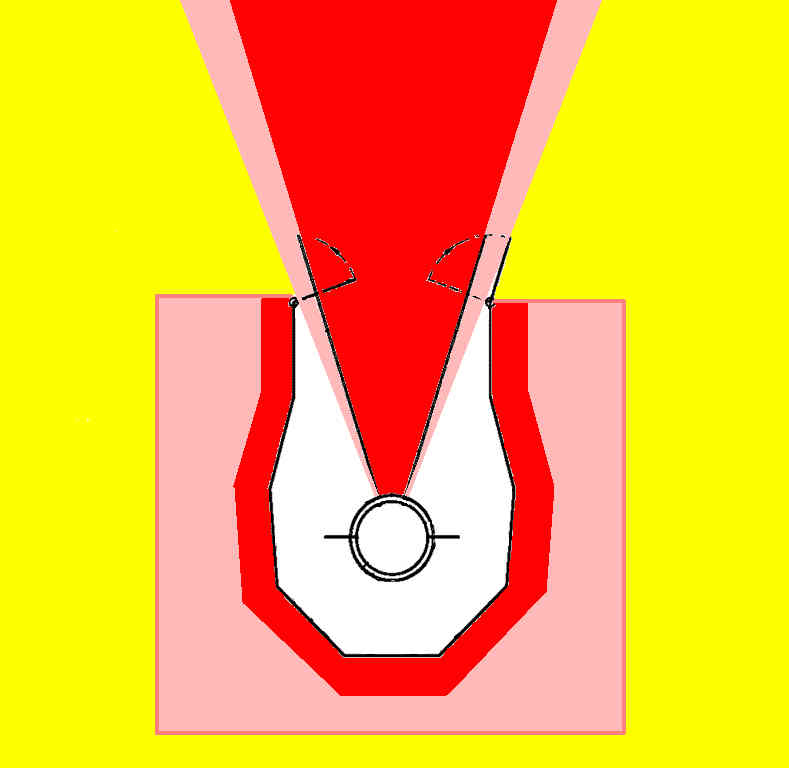
![]() Green (safest)
Green (safest)
Since the discus does not attain the same release velocity as the hammer, the green zone can be thought of as the area from about 5 meters away from the cage, in the area behind the mouth or opening of the cage. In most cases the green zone will include the area around the far side of the cage (depending on the local layout and where it is best for competitors to enter the cage) and extending away from the cage opening.
![]() Yellow (cautionary)
Yellow (cautionary)
The cautionary area is the general region within the 5 meter perimeter described above.
As you move closer to the cage itself, you enter into the potential danger zone. In addition, any area outside the mouth of the cage that is not part of the light red or red zones should be considered to fall in the cautionary zone.
![]() Light red (potential danger)
Light red (potential danger)
This is the area within 1 meter of the cage, and the area just outside the sector. The area outside the sector will widen as the sector widens. This includes all areas outside the mouth of the cage, in the direction of the throw. Remember that wind can have a severe effect on discus flight. Precautions need to made to ensure safety in the light red zone if the winds dictate.
Note that the NCAA mandates a 55o safety zone for all throwing events from the 34.92o sector.
![]() Red (danger)
Red (danger)
The area inside the sector is always a danger area in the discus. If the cage is strung too tightly, or is made of wire fencing, the discus can ricochet back at the competitor and potentially cause injury. As with the hammer, care should be taken that the implement does not bounce upon landing. In addition, the implement may ʺskipʺ or skid on contact with the landing area. Officials and those in the impact area should take care to monitor the conditions and see how the implements react to the surface.
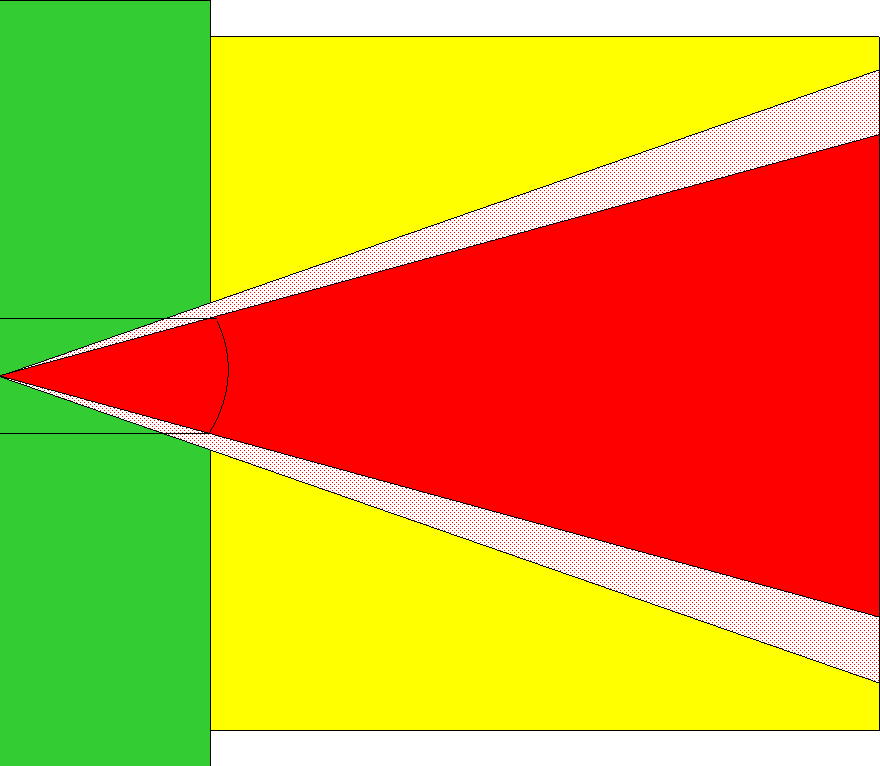
![]() Green (safest)
Green (safest)
The green area is from the toe board, back towards the beginning of the runway. The javelin provides perhaps the largest green zone since the potential for injury is confined to the area where the javelin may land.
![]() Yellow (cautionary)
Yellow (cautionary)
The yellow zone is the area extending from a line drawn through the ends of the toe board in the direction of the impact area. Since the flight of the implement may be altered by wind conditions after it has been released by the competitor, any potential landing area beyond the toe board should be considered cautionary.
![]() Light red (potential danger)
Light red (potential danger)
Similar to the other events, the light red/potential danger zone is from the toe board in the direction of the impact area on either side of the sector. It widens as the sector widens. Wind can have a sever effect on the path of the javelin, and should always be considered for every throw.
![]() Red (danger)
Red (danger)
Generally, we consider any area in the impact area to be part of the danger zone. The important thing to remember with the javelin is that wind can change the path of the implement after is thrown much more than the other implements. For this reason, officials in the impact area should judge the wind for each throw, and adjust accordingly.

![]() Green (safest)
Green (safest)
There really is no green zone in the hammer. Due to the dynamic nature of the event, and the potential for the hammer wire or weight harness to break, or the competitor to loose his/her grip, the entire area around the hammer cage is cautionary at best.
![]() Yellow (cautionary)
Yellow (cautionary)
The entire area from the doors back through the circle that is outside the protective cage is considered cautionary. Even though the cage is there, there is no guarantee that the material of the cage can stop the hammer. In reality, the purpose of the cage is to dissipate the energy of the implement, slowing it down to the point where it will stop.
We feel that the cautionary area should be expanded if the cage is old, or is constructed of metal fencing. Mesh cord, preferably 2 layers, is best for retarding the momentum of the implement.
![]() Light red (potential danger)
Light red (potential danger)
Any area within 5 meters of the cage, and the interior of the cage area, are considered potentially dangerous. If the implement breaks, the head of the hammer can skid under the netting. The wire could penetrate through a hole in the netting. The hammer head could burst through the netting. For the competitor in the circle, if the netting is strung too tightly, the hammer could bounce back at them, creating a potential for serious injury. Remember that not only the head of the hammer, but the wire and handle are also potentially dangerous.
Note that the NCAA mandates a 55o safety zone for all throwing events from the 34.92o sector.
![]() Red (danger)
Red (danger)
Any part of the potential landing area that is outside or not blocked by the doors, should be considered the danger area. The hammer head, wire and handle are all potentially dangerous, and potentially lethal. It is important to remember that the wire, as it is spinning about the center of mass of the hammer, can cut through bone and flesh very easily, and should be avoided when in the landing area. On some landing surfaces (such as artificial ones or very hard ground) the hammer may bounce after hitting the ground. Officials and spectators should be aware of the potential for the implement to ricochet if it strikes a hard surface, or if it should strike a rock just below the surface of the ground.